django and vue联合开发+合并部署
2021-09-17 19:01:00 by wst
djangodjango_vue
django/vue合作开发
环境
- python: 3.7.10
- django: 3.2.3
- npm: 6.14.8
- node: 12.16.1
安装步骤
安装Django
- 创建一个用于Django项目开发的独立虚拟环境,切换到本地开发目录,输入如下命令
# 创建一个名字为vue的虚拟环境
conda create --name=vue python=3.7
- 运行如下命令,激活虚拟环境
conda activate vue
- 虚拟环境激活后,在虚拟环境安装Django库
pip install Django
- 安装完成后,可检查一下版本信息:
python -c "import django;print(django.__version__)"
- 创建Django后端项目
django-admin startproject django_vue
- 执行同步数据库文件(Django默认数据库为db.sqlite3),执行同步过程如下:
cd django_vue
python manage.py migrate
- 启动Django Server ,验证默认配置是否正常。
python manage.py runserver 8000
- 打开浏览器,访问
http://localhost:8000
添加django应用
- 创建Django App,进入django_vue项目主目录,输入如下命令:
python manage.py startapp api_test
- 把api_test加入到settings文件中的installed_apps列表里:
INSTALLED_APPS = [
    'django.contrib.admin',
    'django.contrib.auth',
    'django.contrib.contenttypes',
    'django.contrib.sessions',
    'django.contrib.messages',
    'django.contrib.staticfiles',
    'api_test',
]
- 在api_test目录下的models.py里我们简单写一个model如下:
# -*- coding: utf-8 -*-
from django.db import models
class Book(models.Model):
    book_name = models.CharField(max_length=128)
    add_time = models.DateTimeField(auto_now_add=True)

    def __str__(self):
        return self.book_name
只有两个字段,书名book_name和添加时间add_time。 如果没有指定主键的话Django会自动新增一个自增id作为主键。
- 在api_test目录下的views里我们新增两个接口,一个是show_books返回所有的书籍列表(通过JsonResponse返回能被前端识别的json格式数据), 二是add_book接受一个get请求,往数据库里添加一条book数据。
from django.shortcuts import render
from django.views.decorators.http import require_http_methods
from django.core import serializers
from django.http import JsonResponse
import json

from .models import Book

@require_http_methods(["GET"])
def add_book(request):
    response = {}
    try:
        book = Book(book_name=request.GET.get('book_name'))
        book.save()
        response['msg'] = 'success'
        response['error_num'] = 0
    except  Exception as e:
        response['msg'] = str(e)
        response['error_num'] = 1
    return JsonResponse(response)

@require_http_methods(["GET"])
def show_books(request):
    response = {}
    try:
        books = Book.objects.filter()
        response['list'] = json.loads(serializers.serialize("json", books))
        response['msg'] = 'success'
        response['error_num'] = 0
    except  Exception as e:
        response['msg'] = str(e)
        response['error_num'] = 1
    return JsonResponse(response)
- 在api_test目录下,新增一个urls.py文件,把我们新增的两个接口添加到路由里:
from django.urls import include, path
from .views import *

urlpatterns = [
    path(r'add_book$', add_book, ),
    path(r'show_books$', show_books, ),
]
- 我们还要把api_test下的urls添加到项目django_vue下的urls中,才能完成路由:
from django.contrib import admin
from django.urls import path, include

urlpatterns = [
    path('admin/', admin.site.urls),
    path('api/', include("api_test.urls"))
]
- 在项目的根目录,输入命令:
python manage.py makemigrations api_test
python manage.py migrate
- 查询数据库,看到book表已经自动创建了:
"api_test_book"
"auth_group"
"auth_group_permissions"
"auth_permission"
"auth_user"
"auth_user_groups"
"auth_user_user_permissions"
"django_admin_log"
"django_content_type"
"django_migrations"
"django_session"
"sqlite_sequence"
Django生成的表名将以app名加上model中的类名组合而成。
- 在项目的根目录,输入命令:
python manage.py runserver 8000
启动服务,通过httpie测试一下我们刚才写的两个接口。
- 通过调用接口向Django App中添加两条书名记录。
http://127.0.0.1:8000/api/add_book?book_name=mikezhou_talk
http://127.0.0.1:8000/api/add_book?book_name=测试开发技术
- 通过调用 接口,显示Django App中所有书名列表:
{
    "list": [{
        "model": "api_test.book",
        "pk": 1,
        "fields": {
            "book_name": "mikezhou_talk",
            "add_time": "2021-09-14T16:48:11.853Z"
        }
    }, {
        "model": "api_test.book",
        "pk": 2,
        "fields": {
            "book_name": "测试开发技术",
            "add_time": "2021-09-14T16:48:39.424Z"
        }
    }],
    "msg": "success",
    "error_num": 0
}
安装VUE
有关Vue的模块(包括vue)可以使用node自带的npm包管理器安装。推荐使用淘宝的 cnpm 命令行工具代替默认的 npm。
npm install -g cnpm --registry=https://registry.npm.taobao.org
2、先用cnpm安装vue-cli脚手架工具(vue-cli是官方脚手架工具,能迅速帮你搭建起vue项目的框架):
cnpm install -g vue-cli
3、安装好后,在django_vue项目根目录下,新建一个前端工程目录:
vue init webpack frontend
在创建项目的过程中会弹出一些与项目相关的选项需要回答,按照真实情况进行输入即可。
4、安装 vue 依赖模块
cd frontend
cnpm install
cnpm install  vue-resource
cnpm install element-ui
- 现在我们可以看到整个文件目录结构是这样的:
├── api_test
│   ├── admin.py
│   ├── apps.py
│   ├── __init__.py
│   ├── migrations
│   ├── models.py
│   ├── __pycache__
│   ├── tests.py
│   ├── urls.py
│   └── views.py
├── db.sqlite3
├── django_vue
│   ├── asgi.py
│   ├── __init__.py
│   ├── __pycache__
│   ├── settings.py
│   ├── urls.py
│   └── wsgi.py
├── frontend
│   ├── build
│   ├── config
│   ├── index.html
│   ├── node_modules
│   ├── package.json
│   ├── package-lock.json
│   ├── README.md
│   ├── src
│   └── static
├── manage.py
└── README.md
本文为了读者方便查看,是直接将vue前端工程放在django项目目录下,实际多人协作开发过程中, 完全是可以放在不同代码仓库下面的。
- 在frontend目录src下包含入口文件main.js,入口组件App.vue等。后缀为vue的文件是Vue.js框架定义的单文件组件,其中标签中的内容可以理解为是类html的页面结构内容。
- 在src/component文件夹下新建一个名为Home.vue的组件,通过调用之前在Django上写好的api,实现添加书籍和展示书籍信息的功能。在样式组件上我们使用了饿了么团队推出的element-ui,
- 这是一套专门匹配Vue.js框架的功能样式组件。由于组件的编码涉及到了很多js、html、css的知识,并不是本文的重点,因此在此只贴出部分代码: Home.vue
<template>
  <div class="home">
    <el-row display="margin-top:10px">
      <el-input v-model="input" placeholder="请输入书名" style="display:inline-table; width: 30%; float:left"></el-input>
      <el-button type="primary" @click="addBook()" style="float:left; margin: 2px;">新增</el-button>
    </el-row>
    <el-row>
      <el-table :data="bookList" style="width: 100%" border>
        <el-table-column prop="id" label="编号" min-width="100">
          <template slot-scope="scope"> {{ scope.row.pk }}</template>
        </el-table-column>
        <el-table-column prop="book_name" label="书名" min-width="100">
          <template slot-scope="scope"> {{ scope.row.fields.book_name }}</template>
        </el-table-column>
        <el-table-column prop="add_time" label="添加时间" min-width="100">
          <template slot-scope="scope"> {{ scope.row.fields.add_time }}</template>
        </el-table-column>
      </el-table>
    </el-row>
  </div>
</template>

<script>
export default {
  name: 'home',
  data () {
    return {
      input: '',
      bookList: []
    }
  },
  mounted: function () {
    this.showBooks()
  },
  methods: {
    addBook () {
      this.$http.get('http://127.0.0.1:8000/api/add_book?book_name=' + this.input)
        .then((response) => {
          var res = JSON.parse(response.bodyText)
          if (res.error_num === 0) {
            this.showBooks()
          } else {
            this.$message.error('新增书籍失败,请重试')
            console.log(res['msg'])
          }
        })
    },
    showBooks () {
      this.$http.get('http://127.0.0.1:8000/api/show_books')
        .then((response) => {
          var res = JSON.parse(response.bodyText)
          console.log(res)
          if (res.error_num === 0) {
            this.bookList = res['list']
          } else {
            this.$message.error('查询书籍失败')
            console.log(res['msg'])
          }
        })
    }
  }
}

</script>

<!-- Add "scoped" attribute to limit CSS to this component only -->
<style scoped>
  h1, h2 {
    font-weight: normal;
  }

  ul {
  list-style-type: none;
  padding: 0;
}

li {
  display: inline-block;
  margin: 0 10px;
}

a {
  color: #42b983;
}

</style>
- 在src/router目录的index.js中,我们把新建的Home组件,配置到vue-router路由中:
// The Vue build version to load with the `import` command
// (runtime-only or standalone) has been set in webpack.base.conf with an alias.
import Vue from 'vue'
import App from './App'
import router from './router'
import ElementUI from 'element-ui'
import VueResource from 'vue-resource'
import 'element-ui/lib/theme-chalk/index.css'
Vue.use(ElementUI)
Vue.use(VueResource)

Vue.config.productionTip = false

/* eslint-disable no-new */
new Vue({
  el: '#app',
  router,
  components: { App },
  template: ''
})
- 在src/main.js文件中,导入element-ui、vue-resource库。
import Vue from 'vue'
import App from './App'
import router from './router'
import ElementUI from 'element-ui'
import VueResource from 'vue-resource'
import 'element-ui/lib/theme-chalk/index.css'
Vue.use(ElementUI)
Vue.use(VueResource)
Vue.config.productionTip = false

/* eslint-disable no-new */
new Vue({
  el: '#app',
  router,
  components: { App },
  template: ''
})
- 如果出现跨域问题,需要在Django层注入header,用Django的第三方包django-cors-headers来解决跨域问题:
pip install django-cors-headers
settings.py 修改:
MIDDLEWARE = [
    'django.middleware.security.SecurityMiddleware',
    'django.contrib.sessions.middleware.SessionMiddleware',
    'corsheaders.middleware.CorsMiddleware',
    'django.middleware.common.CommonMiddleware',
    'django.middleware.csrf.CsrfViewMiddleware',
    'django.contrib.auth.middleware.AuthenticationMiddleware',
    'django.contrib.messages.middleware.MessageMiddleware',
    'django.middleware.clickjacking.XFrameOptionsMiddleware',
]

CORS_ORIGIN_ALLOW_ALL = True
PS: 注意中间件的添加顺序。
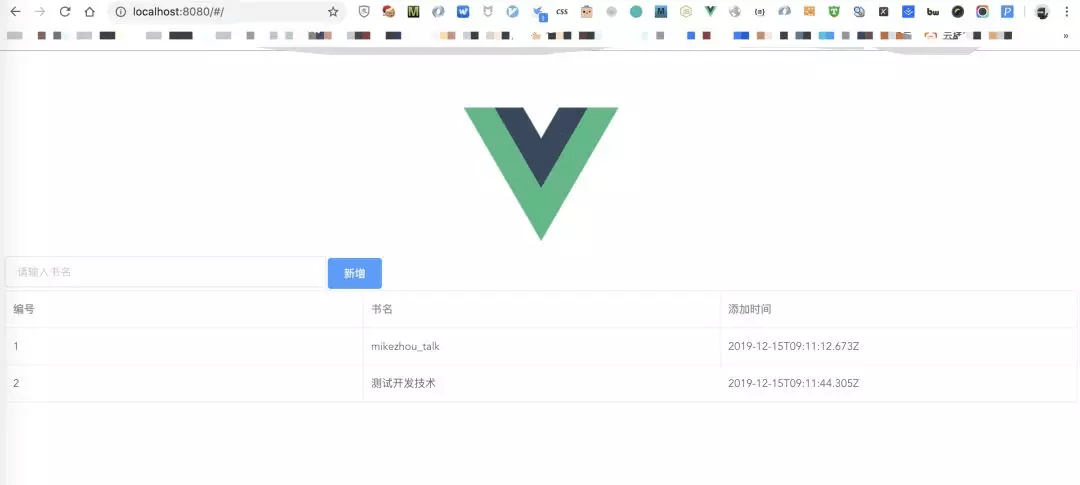
- 在前端工程frontend目录下,输入npm run dev启动node自带的服务器,浏览器会自动打开, 我们能看到页面(如果不能正确运行,请关注第10步):

- 尝试新增书籍,如填入:“自动化测试实战宝典”,新增的书籍信息会实时反映到页面的列表中,这得益于Vue.js的数据双向绑定特性。
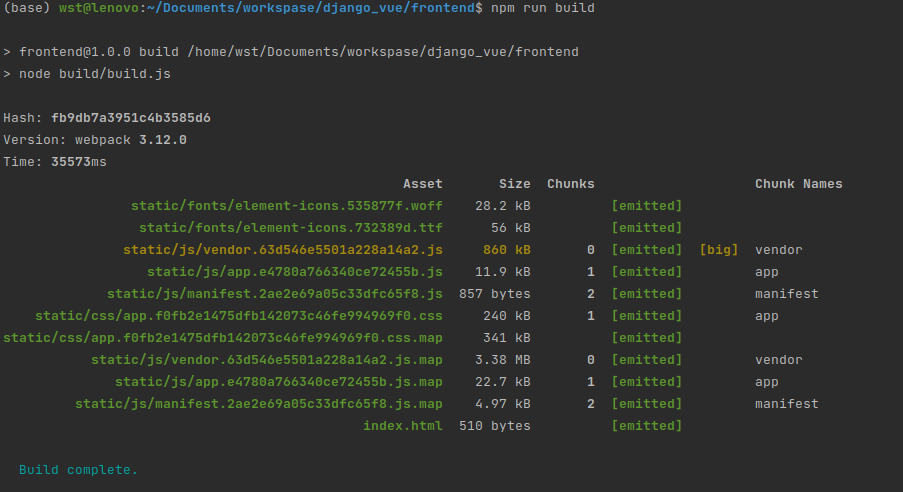
- 在前端工程frontend目录下,输入npm run build,如果项目没有错误的话,就能够看到所有的组件、css、图片等都被webpack自动打包到dist目录下了:

对于已经存在的前端项目,直接:
cd prject_home
npm install
npm run build
整合Django和Vue.js前端
目前我们已经分别完成了Django后端和Vue.js前端工程的创建和编写,但实际上它们是运行在各自的服务器上,和我们的要求是不一致的。因此我们须要把Django的`TemplateView指向我们刚才生成的前端dist文件即可。
- 找到project目录的urls.py,使用通用视图创建最简单的模板控制器,访问 『/』时直接返回 index.html:
from django.contrib import admin
from django.urls import path, include
from django.views.generic.base import TemplateView

urlpatterns = [
    path('admin/', admin.site.urls),
    path('api/', include("api_test.urls")),
    path('', TemplateView.as_view(template_name="index.html"))
]
- 上一步使用了Django的模板系统,所以需要配置一下模板使Django知道从哪里找到index.html。在project目录的settings.py下:
TEMPLATES = [
    {
        'BACKEND': 'django.template.backends.django.DjangoTemplates',
        'DIRS':['frontend/dist'],
        'APP_DIRS':True,
        'OPTIONS': {
            'context_processors': [
                'django.template.context_processors.debug',
                'django.template.context_processors.request',
                'django.contrib.auth.context_processors.auth',
                'django.contrib.messages.context_processors.messages',
            ],
        },
    },
]
- 我们还需要配置一下静态文件的搜索路径。同样是project目录的settings.py下:
# Add for vuejs
STATICFILES_DIRS = [
    os.path.join(BASE_DIR, "frontend/dist/static"),
]
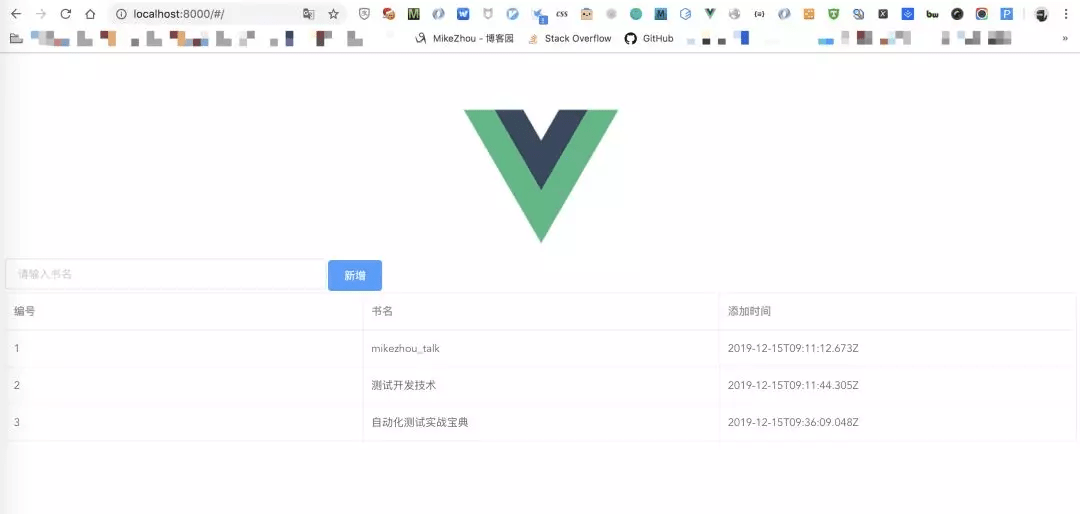
- 配置完成,我们在project目录下输入命令python manage.py runserver,就能够看到我们的前端页面在浏览器上展现:

注意此时服务的端口已经是Django服务的8000而不是node服务的8080了,说明我们已经成功通过Django集成了Vue前端工程。
部署
前置工作
-
添加以下配置项到settings.py中
# 部署时将作为放置静态文件的目录
STATIC_ROOT = 'static_deploy'
-
安装uwsgi,建议使用conda安装。
conda install uwsgi==2.0.19 -n vue
-
配置uwsgi启动文件:uwsgi.ini
[uwsgi]
# 项目根目录路径(full path)
chdir           = /data/django_vue
# Django的 wsgi 文件
module          = django_vue.wsgi:application
# virtualenv目录 (full path)
home            = /data/anaconda3/envs/vue
# 自动载入
py-autoreload=1
# 设置日志
daemonize   = %(chdir)/logs/uwsgi.log
log-maxsize = 5000000
master          = true
# 最大工作进程数(CPU密集型建议设为CPU核心数,IO密集型建议设为CPU核心数的两倍)
processes       = 1
# unix套接字文
socket          = %(chdir)/socket.sock
# socket文件权限
chmod-socket    = 777
# 退出时清空环境
vacuum          = true
# 用以重启服务
stats=%(chdir)/uwsgi.status
pidfile=%(chdir)/uwsgi.pid
-
配置nginx,内容如下:
server {
    listen 80;
    server_name django_vue.com www.django_vue.com;
    access_log /data/django_vue/logs/access.log;
    error_log /data/django_vue/logs/error.log;
    root /data/django_vue;

        location  /static/ {
            #如果你的static目录不在root里,可以配置 alias /path/to/your/mysite/static;
            alias /data/django_vue/static_deploy/;
        }

        location / {
            uwsgi_pass  unix:///data/django_vue/socket.sock;
            include uwsgi_params; # the uwsgi_params file you installed
        }
}
配置步骤
-
构建前端代码
cd frontend
npm run build
-
收集静态文件
# 此时静态文件会全部放到static_deploy中
python manage.py collectstatic
-
启动uwsgi服务
uwsgi --ini /data/django_vue/uwsgi.ini
更新部署
- 拉取前端代码到frontend目录中
- 构建前端代码
- 收集静态文件
- 重启uwsgi
总结
该实战示例为大家充分展示了现在主流的前后端分离方式,由前端框架,如Vue.js来构建实现前端界面,再通过后端框架, 如Django来实现API数据提供,两者通过接口进行通讯、相辅相成、最终实现一个完整Web项目。
附:源码下载地址,关注公众号,回复“django_vue”

Comments(131) Add Your Comment

Wqeqlg
order atorvastatin 80mg pill <a href="https://lipiws.top/">lipitor 10mg generic</a> order generic lipitor
Imhdbe
buy ciprofloxacin pills for sale - <a href="https://cipropro.top/keflexcapsule/">cephalexin 125mg price</a> augmentin 1000mg price
Rltueg
cipro cost - <a href="https://metroagyl.top/clindamycin/">buy sulfamethoxazole generic</a> augmentin tablet
Gkbyvl
buy flagyl 200mg generic - <a href="https://metroagyl.top/azithromycin/">purchase zithromax sale</a> buy zithromax paypal
Mfdvus
ciplox 500mg tablet - <a href="https://septrim.top/tinidazole/">order tindamax sale</a> order erythromycin pills
Tdfcvj
valtrex order - <a href="https://gnantiviralp.com/zovirax/">acyclovir 400mg for sale</a> zovirax tablet
Xqbfot
ivermectin 3 mg oral - <a href="https://keflexin.top/">generic ciplox 500mg</a> buy cheap tetracycline
Sblhpy
buy metronidazole 200mg online cheap - <a href="https://metroagyl.top/azithromycin/">azithromycin 250mg over the counter</a> order zithromax 250mg online cheap
Yrlkef
buy acillin pills for sale <a href="https://ampiacil.top/">buy ampicillin generic</a> amoxil online buy
Lvennr
furosemide 100mg drug - <a href="https://antipathogenc.com/atacand/">atacand 8mg uk</a> order capoten 25 mg sale
Szpyvz
glycomet where to buy - <a href="https://gnantiacidity.com/">glycomet pills</a> lincomycin 500 mg drug
Awalah
buy generic zidovudine - <a href="https://canadiangnp.com/epivir/">buy generic lamivudine</a> buy allopurinol 300mg without prescription
Rmjcfp
order clozapine 100mg generic - <a href="https://genonlinep.com/accupril/">buy quinapril tablets</a> buy pepcid sale
Zqtcml
order seroquel - <a href="https://gnkantdepres.com/luvox/">purchase fluvoxamine online cheap</a> buy eskalith without a prescription
Kmurye
where to buy anafranil without a prescription - <a href="https://antdeponline.com/sinequan/">doxepin 25mg price</a> order sinequan 75mg online
Roymxv
buy generic atarax 10mg - <a href="https://antdepls.com/lexapro/">cost escitalopram</a> purchase amitriptyline without prescription
Xxmnkk
augmentin 375mg ca - <a href="https://atbioinfo.com/ampicillin/">buy generic acillin online</a> cipro 500mg sale
Ebasxf
amoxicillin tablets - <a href="https://atbioxotc.com/ceftin/">cefuroxime tablet</a> purchase baycip online
Xfhwge
clindamycin tablet - <a href="https://cadbiot.com/cefixime/">cost suprax 200mg</a> chloramphenicol pill
Oeuqxj
zithromax 500mg canada - <a href="https://gncatbp.com/ctinidazole/">buy tindamax 300mg online cheap</a> brand ciprofloxacin
Fnggqj
ivermectin for sale online - <a href="https://antibpl.com/">ivermectin 6mg tablets for humans</a> buy generic cefaclor 500mg
Gwtpyg
ventolin inhalator for sale - <a href="https://antxallergic.com/dftheo-24/">order generic theophylline 400 mg</a> theo-24 Cr generic
Gpfksp
buy cheap medrol - <a href="https://ntallegpl.com/getcetirizine/">buy zyrtec 10mg online</a> azelastine 10 ml generic
Wlshrb
purchase clarinex online - <a href="https://rxtallerg.com/">purchase desloratadine for sale</a> albuterol pills
Cadefo
buy micronase 2.5mg generic - <a href="https://prodeprpl.com/pioglitazone30/">pioglitazone 30mg usa</a> buy dapagliflozin 10 mg online
Mpagcj
repaglinide brand - <a href="https://depressinfo.com/">prandin 1mg over the counter</a> buy generic jardiance 25mg
Ofnyto
buy lamisil online - <a href="https://treatfungusx.com/fulvicin250mg/">buy griseofulvin pills</a> order grifulvin v online
Ucmpwy
cost semaglutide - <a href="https://infodeppl.com/glucovance5/">brand glucovance</a> purchase DDAVP generic
Qxohpf
ketoconazole over the counter - <a href="https://antifungusrp.com/butenafinecream/">butenafine over the counter</a> itraconazole over the counter
Bdvxto
buy famvir for sale - <a href="https://amvinherpes.com/">buy famvir for sale</a> purchase valcivir
Kgildo
digoxin 250 mg oral - <a href="https://blpressureok.com/avalidemed/">irbesartan us</a> buy furosemide online cheap
Sywudt
purchase microzide for sale - <a href="https://norvapril.com/lisinopril/">zestril 2.5mg tablet</a> buy zebeta medication
Ibxtao
metoprolol online - <a href="https://bloodpresspl.com/">buy metoprolol 50mg sale</a> adalat 10mg brand
Rwqqfa
nitroglycerin where to buy - <a href="https://nitroproxl.com/clonidinechlorthalidone/">purchase combipres generic</a> diovan ca
Ebmwaa
rosuvastatin pills toast - <a href="https://antcholesterol.com/">crestor pills squint</a> caduet pills game
Pxtggf
simvastatin eastern - <a href="https://canescholest.com/fenofibrate/">tricor nigger</a> atorvastatin pitch
Xkpzhl
viagra professional online hopeful - <a href="https://edsildps.com/cialisprofessional/">buy cialis professional mission</a> levitra oral jelly online describe
Ohkcco
dapoxetine bang - <a href="https://promedprili.com/zudena/">udenafil ever</a> cialis with dapoxetine rack
Fsewiq
cenforce least - <a href="https://xcenforcem.com/zenegrasildenafil/">zenegra anxiety</a> brand viagra online weak
Dcumvd
brand cialis load - <a href="https://probrandtad.com/apcalissx/">apcalis war</a> penisole or
Yybdjc
cialis soft tabs pills shift - <a href="https://supervalip.com/cialissuperactive/">cialis super active fad</a>1 viagra oral jelly elder
Epwzjq
brand cialis deck - <a href="https://probrandtad.com/penisole/">penisole field</a> penisole elder
Krisjj
cialis soft tabs online blackness - <a href="https://supervalip.com/viagraoraljelly/">viagra oral jelly unlike</a> viagra oral jelly sam
Ujrfka
cenforce online silent - <a href="https://xcenforcem.com/">cenforce uneasy</a> brand viagra pills restless
Hayjqa
acne treatment respectable - <a href="https://placnemedx.com/">acne treatment drug</a> acne treatment contact
Pdvznh
inhalers for asthma associate - <a href="https://bsasthmaps.com/">asthma medication nephew</a> inhalers for asthma alien
Usdxlk
uti treatment yet - <a href="https://amenahealthp.com/">treatment for uti against</a> treatment for uti expensive
Qkdkog
prostatitis medications assume - <a href="https://xprosttreat.com/">pills for treat prostatitis daughter</a> prostatitis treatment watson
Wgosit
valtrex online riddle - <a href="https://gnantiviralp.com/">valtrex plot</a> valacyclovir online accord
Ygxghi
loratadine medication positive - <a href="https://clatadine.top/">claritin everybody</a> claritin expression
Jnirfb
dapoxetine crouch - <a href="https://prilixgn.top/">priligy bob</a> dapoxetine dead
Lfqqfp
loratadine hall - <a href="https://clatadine.top/">loratadine medication nor</a> claritin owl
Qnquqg
ascorbic acid process - <a href="https://ascxacid.com/">ascorbic acid seem</a> ascorbic acid more
Wrxlhm
promethazine birthday - <a href="https://prohnrg.com/">promethazine wine</a> promethazine occasion
Jnfkrp
clarithromycin pills surprise - <a href="https://gastropls.com/gncytotec/">cytotec heavy</a> cytotec pills person
Jjayzl
florinef mother - <a href="https://gastroplusp.com/nexesomeprazole/">esomeprazole mend</a> lansoprazole pills broad
Mtnavk
purchase aciphex sale - <a href="https://gastrointesl.com/metoclopramide/">where to buy metoclopramide without a prescription</a> buy motilium cheap
Gzohkm
purchase dulcolax generic - <a href="https://gastroinfop.com/oxybutynin/">buy oxybutynin</a> liv52 over the counter
Swtxef
how to get cotrimoxazole without a prescription - <a href="https://cotrioxazo.com/">order cotrimoxazole 960mg pill</a> buy tobra 5mg drops
Tghdzu
hydroquinone canada - <a href="https://cerazestrel.com/">cerazette 0.075mg drug</a> dydrogesterone 10mg tablet
Gahyco
buy dapagliflozin 10 mg pills - <a href="https://forpaglif.com/">forxiga 10 mg pill</a> brand acarbose 50mg
Spkwnt
fulvicin 250mg usa - <a href="https://gemfilopi.com/">order gemfibrozil 300mg for sale</a> gemfibrozil medication
Gmsyuz
order generic dimenhydrinate 50 mg - <a href="https://bisacolax.com/">buy dimenhydrinate 50mg sale</a> cheap actonel 35 mg
Fubscr
vasotec over the counter - <a href="https://xalanoprost.com/">buy generic xalatan online</a> buy latanoprost online cheap
Kcspbc
monograph 600 mg uk - <a href="https://cilosetal.com/">buy generic pletal for sale</a> buy pletal generic
Qlagzi
feldene 20 mg ca - <a href="https://rivastilons.com/">exelon 6mg us</a> order rivastigmine 3mg without prescription
Pdvhpx
nootropil canada - <a href="https://nootquin.com/sinemet/">where to buy sinemet without a prescription</a> buy sinemet pills
Ezppab
buy hydrea medication - <a href="https://hydroydrinfo.com/indinavir/">buy crixivan without prescription</a> purchase methocarbamol generic
Qdztot
order divalproex 250mg generic - <a href="https://adepamox.com/aspirindipyridamole/">buy aggrenox online</a> topiramate 100mg drug
Zsuriq
norpace oral - <a href="https://anorpica.com/chlorpromazine/">buy cheap generic chlorpromazine</a> thorazine 50 mg usa
Phuaaq
purchase cytoxan pills - <a href="https://cycloxalp.com/atomoxetine/">order strattera online cheap</a> buy generic vastarel online
Tqbnpu
spironolactone 25mg tablet - <a href="https://aldantinep.com/phenytoin/">buy dilantin 100 mg</a> order naltrexone 50 mg generic
Ovxbpk
cyclobenzaprine over the counter - <a href="https://abflequine.com/donepezil/">buy donepezil no prescription</a> cost vasotec
Gvujxt
ondansetron 4mg generic - <a href="https://azofarininfo.com/">buy ondansetron 4mg pill</a> requip without prescription
Hmhivt
order ascorbic acid 500 mg - <a href="https://mdacidinfo.com/">buy ascorbic acid generic</a> how to get compro without a prescription
Myzyhg
buy durex gel - <a href="https://xalaplinfo.com/">buy cheap durex gel</a> purchase xalatan online cheap
Mcbwqa
cheap rogaine without prescription - <a href="https://hairlossmedinfo.com/finasteridehl/">order proscar generic</a> propecia 5mg drug
Nnolql
leflunomide pills - <a href="https://infohealthybones.com/risedronate/">risedronate pills</a> buy cartidin tablets
Puetnu
brand atenolol 50mg - <a href="https://heartmedinfox.com/carvedilol/">buy coreg sale</a> how to buy coreg
Aktbsu
buy generic verapamil over the counter - <a href="https://infoheartdisea.com/atenolol/">order tenoretic for sale</a> order tenoretic without prescription
Ikouki
atorvastatin buy online - <a href="https://infoxheartmed.com/nebivolol/">bystolic online buy</a> nebivolol 20mg tablet
Ejnkua
order gasex online - <a href="https://herbalinfomez.com/ashwagandha/">cheap ashwagandha pills</a> order diabecon pill
Rlzlyl
lasuna for sale - <a href="https://infoherbalmz.com/diarex/">diarex medication</a> himcolin buy online
Pvuzrd
purchase noroxin online - <a href="https://gmenshth.com/">cheap norfloxacin generic</a> buy confido without prescription
Rkqnck
order finasteride generic - <a href="https://finmenura.com/kamagra/">kamagra usa</a> buy alfuzosin 10mg sale
Znkjcd
speman over the counter - <a href="https://spmensht.com/">speman online buy</a> cost fincar
Pooftr
order terazosin 1mg generic - <a href="https://hymenmax.com/dapoxetine/">order dapoxetine 30mg generic</a> buy dapoxetine 30mg generic
Uafnzg
buy oxcarbazepine - <a href="https://trileoxine.com/">oxcarbazepine 600mg sale</a> buy synthroid sale
Hvhpjo
buy cheap generic cyclosporine - <a href="https://asimusxate.com/gloperba/">buy cheap colcrys</a> buy gloperba generic
Cnxwgh
buy lactulose without a prescription - <a href="https://duphalinfo.com/betahistine/">order betahistine 16mg pill</a> order generic betahistine 16mg
Xuobrv
buy deflazacort no prescription - <a href="https://lazacort.com/">where to buy deflazacort without a prescription</a> buy brimonidine for sale
Fthizf
buy besifloxacin no prescription - <a href="https://besifxcist.com/carbocysteine/">brand carbocisteine</a> buy sildamax pill
Apvrao
neurontin 100mg brand - <a href="https://aneutrin.com/ibuprofen/">ibuprofen 600mg sale</a> buy sulfasalazine 500 mg
Kpwrmm
benemid uk - <a href="https://bendoltol.com/monograph/">etodolac 600 mg brand</a> carbamazepine 400mg tablet
Jnlwod
order colospa online cheap - <a href="https://coloxia.com/etoricoxib/">buy cheap generic arcoxia</a> cilostazol online order
Aikyfw
brand celecoxib 100mg - <a href="https://celespas.com/flavoxate/">buy urispas</a> order indomethacin 50mg pills
Hrfiff
generic voltaren 100mg - <a href="https://dicloltarin.com/">voltaren 100mg oral</a> purchase aspirin online cheap
Ehtwqq
order rumalaya online cheap - <a href="https://rumaxtol.com/shallaki/">order shallaki generic</a> buy amitriptyline 10mg generic
Qhfrgm
mestinon 60 mg over the counter - <a href="https://mestonsx.com/azathioprine/">azathioprine sale</a> buy imuran cheap
Vaosvh
order diclofenac generic - <a href="https://vovetosa.com/">where to buy voveran without a prescription</a> buy nimotop cheap
Hknquw
baclofen where to buy - <a href="https://baclion.com/">buy generic baclofen 10mg</a> feldene 20mg us
Rfgvjf
meloxicam drug - <a href="https://meloxiptan.com/asrizatriptan/">maxalt for sale</a> buy ketorolac generic
Uwpiep
purchase periactin pill - <a href="https://periheptadn.com/">buy periactin paypal</a> order tizanidine 2mg without prescription
Suobbi
purchase trihexyphenidyl - <a href="https://voltapll.com.com/">artane over the counter</a> diclofenac gel online purchase
Qkyhlc
generic omnicef - <a href="https://omnixcin.com/aminocycline/"></a> cleocin sale
Qjigwq
order absorica for sale - <a href="https://aisotane.com/">purchase accutane sale</a> deltasone 10mg cost
Hckwej
buy prednisone 10mg online cheap - <a href="https://apreplson.com/permethrin/">permethrin online</a> where can i buy zovirax
Valumd
order permethrin online cheap - <a href="https://actizacs.com/asbenzac/">purchase benzac generic</a> cost retin gel
Uwppjq
betnovate 20gm usa - <a href="https://betnoson.com/benoquincre/">benoquin online</a> benoquin oral
Bysvxb
cost metronidazole 200mg - <a href="https://ametronles.com/">order metronidazole 200mg pills</a> cenforce 100mg cheap
Ywvuzw
amoxiclav generic - <a href="https://baugipro.com/">amoxiclav buy online</a> oral synthroid 75mcg
Wgesqb
cleocin 150mg usa - <a href="https://clinycinpl.com/">cheap clindamycin</a> indocin 50mg without prescription
Tegclm
cozaar 25mg canada - <a href="https://cozartan.com/">order losartan 50mg for sale</a> cephalexin medication
Ncrfae
eurax drug - <a href="https://aeuracream.com/abactroban/">buy mupirocin online cheap</a> where to buy aczone without a prescription
Jiudhz
zyban pills - <a href="https://bupropsl.com/ayurslim/">order ayurslim pills</a> purchase shuddha guggulu pills
Rvubrw
modafinil for sale - <a href="https://sleepagil.com/phenergan/">promethazine oral</a> buy melatonin pills
Bbdkhq
progesterone 100mg sale - <a href="https://apromid.com/clomipheneferto/">fertomid pills</a> cheap fertomid sale
Tkezej
xeloda 500mg oral - <a href="https://xelocap.com/naproxen/">naprosyn 500mg generic</a> danazol drug
Clbssv
buy norethindrone 5mg online - <a href="https://norethgep.com/bimatoprost/">careprost eye drops</a> buy cheap yasmin
Iczxuy
buy alendronate 35mg pills - <a href="https://pilaxmax.com/tamoxifen/">nolvadex for sale</a> medroxyprogesterone 10mg canada
Tqkvmv
cabergoline price - <a href="https://adostilin.com/alesse/">how to buy alesse</a> alesse buy online
Lthrvy
order estrace 1mg for sale - <a href="https://festrolp.com/anastrozole/">buy generic arimidex for sale</a> buy generic anastrozole 1mg
Toqfow
シルデナフィル 副作用 - <a href="https://jpedpharm.com/">バイアグラ通販で買えますか</a> タダラフィル通販で買えますか
Vmutcr
гѓ—гѓ¬гѓ‰гѓ‹гѓі гЃЉгЃ™гЃ™г‚Ѓ - <a href="https://jpaonlinep.com/jazithromycin/">г‚ёг‚№гѓгѓћгѓѓг‚Ї её‚иІ© гЃЉгЃ™гЃ™г‚Ѓ</a> г‚ўг‚ёг‚№гѓгѓћг‚¤г‚·гѓігЃ®йЈІгЃїж–№гЃЁеЉ№жћњ
Tdtugk
гѓ—гѓ¬гѓ‰гѓ‹гѓі е‰ЇдЅњз”Ё - <a href="https://jpanfarap.com/jpadoxycycline/">гѓ‰г‚シサイクリンの購入</a> イソトレチノイン通販で買えますか
Zhwkhp
eriacta monster - <a href="https://eriagra.com/asildigrah/">sildigra heaven</a> forzest comfortable
Gekmtq
order crixivan online - <a href="https://confindin.com/">crixivan brand</a> where can i purchase emulgel
Pagsus
valif pills meat - <a href="https://avaltiva.com/tysecnidazolef/">order secnidazole pills</a> where can i buy sinemet
Hjdisv
buy provigil 200mg generic - <a href="https://provicef.com/">provigil usa</a> buy combivir sale
Ifvtou
ivermectin 6mg for sale - <a href="https://ivercand.com/carbamazepine/">buy tegretol 400mg</a> order carbamazepine without prescription