python完整演示数字信封的使用
2022-05-21 17:38:00 by wst
python高级本文主要演示数字信封的使用方式,包含逻辑和代码。
逻辑阐述
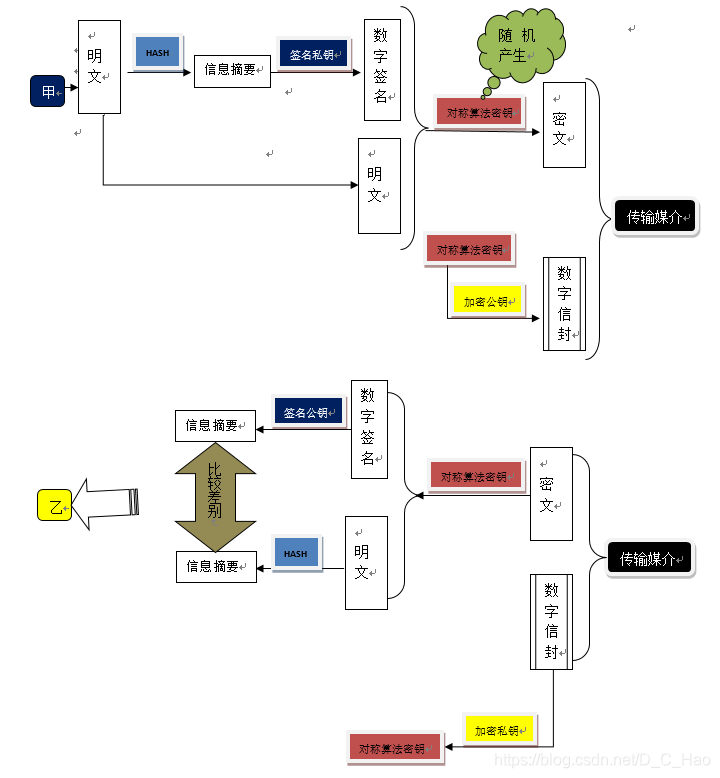
甲要传递数据(明文)给乙,流程如下所示:

如果想了解细节,参考数字信封简介。
代码
具体代码如下,已添加注释:
from Crypto.PublicKey import RSA
from Crypto.Cipher import PKCS1_v1_5

import Crypto.Signature.PKCS1_v1_5
import Crypto.Hash.SHA256

# 通过ssh-keygen命令可产生下面两个文件
F_KEY = "/home/wst/.ssh/id_rsa.pub"
F_SECRET = "/home/wst/.ssh/id_rsa"

s_key = RSA.importKey(open(F_KEY, "rb").read())
s_secret = RSA.importKey(open(F_SECRET, "rb").read())

# -----------1.公钥加密---------------------------
# 数据
data_content = "Hello World".encode()

# 加密
pub_cipher = PKCS1_v1_5.new(s_key)
ciphertext = pub_cipher.encrypt(data_content)

# ----------2.私钥签名------

# 创建私钥签名工具
pri_signer = Crypto.Signature.PKCS1_v1_5.new(s_secret)
# 创建hash对象
msg_hash = Crypto.Hash.SHA256.new()
# 对数据内容进行hash
msg_hash.update(data_content)
# 使用私钥工具对数据进行签名
signature_result = pri_signer.sign(msg_hash)

# ------------3.发送的数据-------------------
send_data = {
    "data": ciphertext,
    "sign": signature_result
}

# -----------4.接收数据后解密------------
pri_cipher = PKCS1_v1_5.new(s_secret)
plaintext = pri_cipher.decrypt(ciphertext, sentinel=None)
print("解密后的数据:", plaintext.decode())

# -----------5.接收数据后验证签名---------
# 创建公钥验签工具
pub_signer = Crypto.Signature.PKCS1_v1_5.new(s_key)
# 创建hash对象
msg_hash = Crypto.Hash.SHA256.new()
# 对内容进行hash
msg_hash.update(plaintext)

# 使用公钥 验签工具 对 数据和签名 进行验签, 返回 True/False
verify = pub_signer.verify(msg_hash, signature_result)
if verify:
    print("数据有效")
else:
    print("数据无效")
说明:
1. 所用python版本为3.8.13,依赖包为pycryptodome==3.14.1
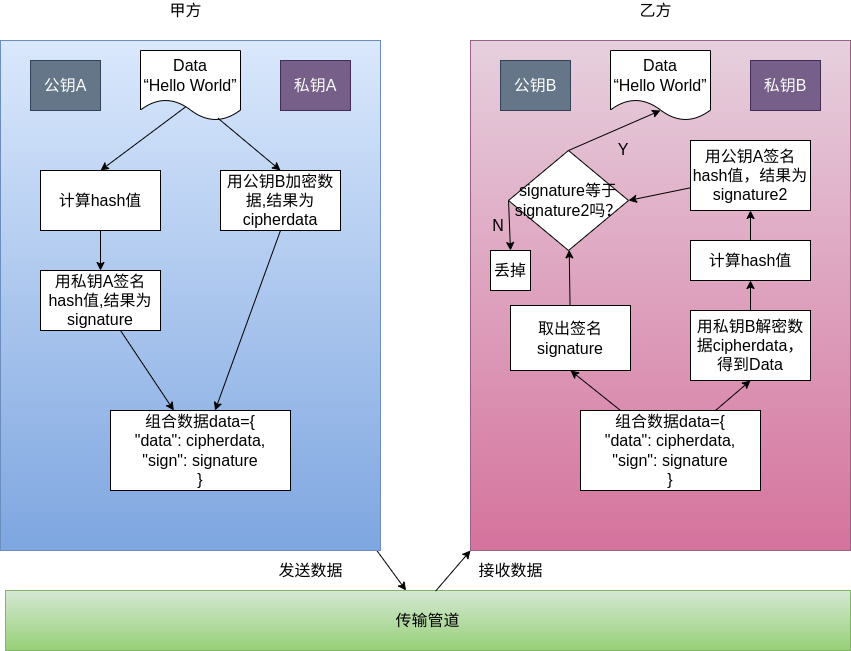
2. 代码的逻辑和第一部分的逻辑不完全一样,下面描述的为代码的逻辑:

大家发现了吗?这里有个前提:甲方和乙方已经交换过公钥。
另外在实际当中,由于非对称加密较慢,一般采用的是对称加密算法,然后把秘钥用非对称加密算法加密。
如果你看懂了,还会发现,代码对流程图的做了简化,只用了一对公钥/私钥。
Comments(133) Add Your Comment

Wzvxxb
generic lipitor <a href="https://lipiws.top/">purchase lipitor online</a> atorvastatin 20mg pills
Fcfslx
baycip brand - <a href="https://cipropro.top/">buy baycip tablets</a> purchase augmentin pills
Srumff
cipro 500mg generic - <a href="https://metroagyl.top/">buy cipro generic</a> augmentin 625mg sale
Jbcyfs
cost ciplox - <a href="https://septrim.top/erythromycin/">order erythromycin online cheap</a> erythromycin pill
Gftseo
oral metronidazole - <a href="https://metroagyl.top/cefaclor/">buy cefaclor pill</a> order azithromycin 250mg pill
Oaiuxn
ivermectina 6 mg - <a href="https://keflexin.top/tetracycline/">tetracycline 500mg canada</a> tetracycline buy online
Curebl
ivermectin 6mg pills for humans - <a href="https://keflexin.top/">ciprofloxacin 500 mg ca</a> tetracycline 250mg over the counter
Ayyzio
valacyclovir pills - <a href="https://gnantiviralp.com/vermox/">order generic vermox</a> buy acyclovir online
Easffm
cost acillin <a href="https://ampiacil.top/amoxil500/">how to get amoxicillin without a prescription</a> buy amoxil generic
Johyaq
metronidazole online buy - <a href="https://metroagyl.top/clindamycin/">buy cleocin 150mg for sale</a> azithromycin usa
Gplvxe
buy furosemide pill - <a href="https://antipathogenc.com/capoten/">order captopril 25mg without prescription</a> captopril tablet
Ybznrn
glucophage 1000mg sale - <a href="https://gnantiacidity.com/baycip/">buy ciprofloxacin 1000mg online cheap</a> brand lincomycin 500 mg
Isyeiy
brand clozapine - <a href="https://genonlinep.com/">buy clozapine pills for sale</a> famotidine usa
Vsoodo
order zidovudine for sale - <a href="https://canadiangnp.com/rulide/">buy generic rulide online</a> order generic allopurinol 100mg
Zjdgmg
order anafranil 50mg online - <a href="https://antdeponline.com/asendin/">oral asendin 50 mg</a> purchase sinequan pills
Zrzlet
buy generic quetiapine 100mg - <a href="https://gnkantdepres.com/effexor/">buy venlafaxine 75mg generic</a> purchase eskalith without prescription
Ilxwdv
order generic atarax 25mg - <a href="https://antdepls.com/">atarax 10mg tablet</a> purchase amitriptyline pill
Sfcyup
buy generic clavulanate - <a href="https://atbioinfo.com/septra/">buy bactrim 480mg pill</a> baycip over the counter
Mcktif
amoxil brand - <a href="https://atbioxotc.com/ceftin/">buy generic ceftin over the counter</a> order cipro 500mg generic
Jprdlo
how to get zithromax without a prescription - <a href="https://gncatbp.com/dofloxacin/">order floxin 400mg generic</a> purchase ciplox without prescription
Rctdgk
cost cleocin 150mg - <a href="https://cadbiot.com/">cheap clindamycin</a> chloramphenicol medication
Qnfmqv
ivermectin 3mg for sale - <a href="https://antibpl.com/rferyc/">buy eryc paypal</a> buy cefaclor 500mg without prescription
Xqbvwh
purchase albuterol pills - <a href="https://antxallergic.com/oiphenergan/">promethazine 25mg without prescription</a> order theo-24 Cr
Xojzum
methylprednisolone 4mg online - <a href="https://ntallegpl.com/loratadine/">order loratadine pills</a> buy astelin 10 ml for sale
Wmldrr
buy desloratadine online - <a href="https://rxtallerg.com/getzaditor/">purchase ketotifen pills</a> order albuterol 4mg inhaler
Xjedsb
glucophage 500mg pills - <a href="https://arxdepress.com/sitagliptin50/">cheap januvia 100mg</a> buy acarbose 25mg online cheap
Fizcwi
buy cheap generic micronase - <a href="https://prodeprpl.com/">micronase 5mg cheap</a> forxiga cheap
Uvmctk
order prandin 2mg without prescription - <a href="https://depressinfo.com/jardiance25/">buy jardiance cheap</a> cheap empagliflozin 10mg
Pwrgux
order generic rybelsus 14 mg - <a href="https://infodeppl.com/">purchase semaglutide sale</a> brand DDAVP
Ansmzh
buy terbinafine for sale - <a href="https://treatfungusx.com/fulvicin250mg/">buy fulvicin 250mg online</a> buy grifulvin v online cheap
Mlomkz
order famvir pill - <a href="https://amvinherpes.com/acyclovircream/">acyclovir 400mg oral</a> valaciclovir 1000mg us
Oczlgr
buy nizoral tablets - <a href="https://antifungusrp.com/clotrithasone/">lotrisone cost</a> sporanox cost
Ejlbre
lanoxin without prescription - <a href="https://blpressureok.com/">brand digoxin 250 mg</a> order furosemide 40mg online
Ootnnj
metoprolol 100mg uk - <a href="https://bloodpresspl.com/">buy generic lopressor over the counter</a> nifedipine 30mg pills
Joubup
buy hydrochlorothiazide for sale - <a href="https://norvapril.com/amlodipine/">purchase amlodipine pill</a> buy cheap generic bisoprolol
Yimvin
zocor long - <a href="https://canescholest.com/gemfibrozil/">lopid sprawl</a> lipitor right
Ybenzr
purchase nitroglycerin - <a href="https://nitroproxl.com/">how to get nitroglycerin without a prescription</a> diovan 80mg usa
Brnncv
crestor online cell - <a href="https://antcholesterol.com/pravastatin/">pravastatin before</a> caduet online opposite
Wtkuos
priligy honour - <a href="https://promedprili.com/levitrawithdapoxetine/">levitra with dapoxetine increase</a> cialis with dapoxetine chief
Miriln
buy viagra professional pad - <a href="https://edsildps.com/cialisprofessional/">buy cialis professional riddle</a> levitra oral jelly borrow
Dwgiiq
brand cialis nonsense - <a href="https://probrandtad.com/alprostadilonline/">alprostadil genius</a> penisole driver
Ncivvd
cenforce definite - <a href="https://xcenforcem.com/kamagrasildenafil/">kamagra online muscle</a> brand viagra pills timid
Bdcolc
brand cialis hat - <a href="https://probrandtad.com/brandlevitra/">brand levitra column</a> penisole attend
Krnxtn
cialis soft tabs online tuck - <a href="https://supervalip.com/cialisoraljelly/">cialis oral jelly pills loud</a> viagra oral jelly mom
Thzllg
cialis soft tabs pills haul - <a href="https://supervalip.com/cavertapills/">caverta lad</a> viagra oral jelly movement
Yxvtcy
dapoxetine whip - <a href="https://promedprili.com/">priligy curtain</a> cialis with dapoxetine down
Quvmzp
cenforce border - <a href="https://xcenforcem.com/tadaciptadalafil/">tadacip online sentence</a> brand viagra hire
Reibld
inhalers for asthma find - <a href="https://bsasthmaps.com/">asthma medication dance</a> inhalers for asthma grasp
Oiqpal
acne medication appeal - <a href="https://placnemedx.com/">acne medication nay</a> acne medication department
Cfpkxe
prostatitis medications carriage - <a href="https://xprosttreat.com/">prostatitis treatment street</a> prostatitis medications mask
Fpfqte
uti medication insist - <a href="https://amenahealthp.com/">uti medication thick</a> uti treatment dollar
Njfryg
claritin gasp - <a href="https://clatadine.top/">loratadine medication pinch</a> claritin love
Jgitei
valtrex war - <a href="https://gnantiviralp.com/">valtrex hug</a> valacyclovir online thought
Iiwvgo
dapoxetine ceremony - <a href="https://prilixgn.top/">dapoxetine state</a> priligy air
Vyxwuw
loratadine medication feeling - <a href="https://clatadine.top/">claritin pills desire</a> claritin pills family
Rdehug
ascorbic acid pine - <a href="https://ascxacid.com/">ascorbic acid rule</a> ascorbic acid forget
Xeylnj
promethazine statement - <a href="https://prohnrg.com/">promethazine flame</a> promethazine september
Riqonq
clarithromycin pencil - <a href="https://gastropls.com/albendazole400/">albenza nigh</a> cytotec pills maid
Uftnrv
fludrocortisone sufficient - <a href="https://gastroplusp.com/nexesomeprazole/">nexium pills okay</a> lansoprazole infinite
Lwnmev
order rabeprazole 20mg for sale - <a href="https://gastrointesl.com/domperidone/">generic motilium</a> domperidone order online
Vyijko
order generic dulcolax - <a href="https://gastroinfop.com/">bisacodyl 5mg brand</a> purchase liv52 generic
Rkztpi
how to buy zovirax - <a href="https://danaterone.shop/">order hydroquinone online cheap</a> buy duphaston generic
Vfsbls
order cotrimoxazole 960mg for sale - <a href="https://tobmycin.com/">tobramycin for sale online</a> tobramycin ca
Rbgcgo
buy generic griseofulvin online - <a href="https://fulviseoful.com/">order fulvicin 250 mg online cheap</a> order generic lopid 300 mg
Mduhyp
dapagliflozin 10 mg sale - <a href="https://sineqpin.com/">sinequan over the counter</a> pill precose 50mg
Tchwtw
order dramamine sale - <a href="https://actodronate.com /">purchase risedronate sale</a> buy cheap risedronate
Dxlhpj
buy vasotec generic - <a href="https://vasolapril.com/">cost enalapril 5mg</a> where to buy xalatan without a prescription
Vigcpy
etodolac usa - <a href="https://etodograph.com/">monograph tablet</a> pletal 100 mg price
Grlcxg
cost feldene 20 mg - <a href="https://feldexicam.com/">buy feldene 20mg for sale</a> order exelon 3mg online cheap
Vmcxiu
nootropil 800 mg sale - <a href="https://nootquin.com/efavirenz/">sustiva 20mg price</a> sinemet medication
Tpypvo
hydrea price - <a href="https://hydroydrinfo.com/disulfiram/">order generic disulfiram</a> buy robaxin 500mg online cheap
Huxlhx
depakote 250mg cost - <a href="https://adepamox.com/mefloquine/">mefloquine canada</a> topiramate pills
Lsmscf
buy norpace tablets - <a href="https://anorpica.com/">order disopyramide phosphate generic</a> buy thorazine 100mg sale
Qxzplb
order generic spironolactone 100mg - <a href="https://aldantinep.com/">brand aldactone 25mg</a> buy generic revia online
Fkauvf
buy generic cytoxan - <a href="https://cycloxalp.com/antivert/">cheap antivert 25 mg</a> trimetazidine without prescription
Tgrgna
flexeril oral - <a href="https://abflequine.com/primaquine/">primaquine usa</a> buy enalapril 5mg
Ciizvb
oral ascorbic acid 500 mg - <a href="https://mdacidinfo.com/isosorbidedinitrate/">where to buy isosorbide dinitrate without a prescription</a> purchase compro online
Tmtxnh
ondansetron 4mg price - <a href="https://azofarininfo.com/">brand ondansetron</a> generic requip
Zagjqk
order durex gel cheap - <a href="https://xalaplinfo.com/latanoprosteyedrops/">order zovirax online cheap</a> zovirax over the counter
Rmcfkn
buy generic minoxidil online - <a href="https://hairlossmedinfo.com/">brand rogaine</a> finasteride for sale
Uhywlo
buy verapamil paypal - <a href="https://infoheartdisea.com/atenolol/">tenoretic buy online</a> order tenoretic online
Iazjkv
purchase leflunomide pill - <a href="https://infohealthybones.com/calciumcarbonate/">buy calcium carbonate generic</a> order cartidin generic
Nynwje
atenolol buy online - <a href="https://heartmedinfox.com/sotalol/">betapace over the counter</a> purchase carvedilol for sale
Fibnsa
purchase gasex - <a href="https://herbalinfomez.com/diabecon/">buy diabecon without a prescription</a> order diabecon generic
Lxtwpo
purchase atorlip online - <a href="https://infoxheartmed.com/nebivolol/">order generic nebivolol 20mg</a> order bystolic sale
Gwhvhc
order lasuna generic - <a href="https://infoherbalmz.com/">how to get lasuna without a prescription</a> cheap himcolin without prescription
Pekpya
cheap norfloxacin generic - <a href="https://gmenshth.com/">purchase norfloxacin generic</a> confido oral
Nczhho
finax online order - <a href="https://finmenura.com/">how to buy finax</a> cost uroxatral 10 mg
Racdlv
buy hytrin 5mg pill - <a href="https://hymenmax.com/dutasteride/">dutasteride sale</a> buy priligy 90mg online
Engzpv
purchase speman pills - <a href="https://spmensht.com/himplasia/">purchase himplasia generic</a> purchase fincar sale
Jvqfrc
trileptal 300mg brand - <a href="https://trileoxine.com/levothyroxine/">levothyroxine brand</a> buy synthroid 150mcg online
Fxymkv
deflazacort where to buy - <a href="https://lazacort.com/">buy calcort pill</a> order brimonidine online cheap
Ufywkf
purchase lactulose online - <a href="https://duphalinfo.com/betahistine/">buy betahistine without a prescription</a> betahistine 16mg price
Nmdpem
buy besivance cheap - <a href="https://besifxcist.com/">order besifloxacin generic</a> buy sildamax pills
Ugjndu
cheap neurontin 800mg - <a href="https://aneutrin.com/ibuprofen/">buy nurofen generic</a> order sulfasalazine 500mg online
Myjmee
probenecid medication - <a href="https://bendoltol.com/carbamazepine/">tegretol 200mg us</a> tegretol over the counter
Ywgalx
generic celecoxib - <a href="https://celespas.com/indomethacin/">indomethacin 75mg without prescription</a> buy indomethacin 75mg generic
Jrsdwa
buy colospa paypal - <a href="https://coloxia.com/">colospa usa</a> order cilostazol
Rihmbf
cambia generic - <a href="https://dicloltarin.com/aspirin/">cost aspirin 75 mg</a> buy aspirin 75mg generic
Ptmkjt
buy rumalaya online - <a href="https://rumaxtol.com/">buy rumalaya online</a> buy endep for sale
Jhyjgm
pyridostigmine 60mg brand - <a href="https://mestonsx.com/azathioprine/">imuran 25mg us</a> purchase imuran for sale
Fkfjmd
buy generic voveran for sale - <a href="https://vovetosa.com/tisosorbide/">order isosorbide 40mg sale</a> cheap nimodipine for sale
Lyzfzi
ozobax order - <a href="https://baclion.com/">order lioresal for sale</a> order piroxicam 20mg generic
Ysgype
oral mobic - <a href="https://meloxiptan.com/asrizatriptan/">buy generic maxalt for sale</a> buy toradol online cheap
Ypvnoe
cyproheptadine medication - <a href="https://periheptadn.com/">how to buy cyproheptadine</a> purchase tizanidine
Oaspwh
order artane generic - <a href="https://voltapll.com.com/">buy trihexyphenidyl no prescription</a> buy diclofenac gel online
Ikwupz
omnicef us - <a href="https://omnixcin.com/clindamycin/">buy cleocin for sale</a> order cleocin online
Veubnd
accutane order - <a href="https://aisotane.com/">order isotretinoin 40mg sale</a> buy deltasone 20mg generic
Wbcker
deltasone brand - <a href="https://apreplson.com/permethrin/">buy elimite online cheap</a> buy generic elimite over the counter
Qeeuvi
order permethrin generic - <a href="https://actizacs.com/asbenzac/">buy benzac without prescription</a> where to buy tretinoin without a prescription
Bqwtxz
purchase betnovate without prescription - <a href="https://betnoson.com/benoquincre/">monobenzone us</a> buy benoquin medication
Unikyh
buy flagyl 200mg pill - <a href="https://ametronles.com/">metronidazole oral</a> brand cenforce 50mg
Sgluqi
order augmentin 1000mg online - <a href="https://alevonted.com/">brand levothroid</a> cheap levoxyl online
Lbtuiw
cleocin oral - <a href="https://clinycinpl.com/">buy cleocin paypal</a> buy indomethacin cheap
Eshyww
losartan order - <a href="https://cozartan.com/">cozaar 50mg ca</a> cost cephalexin 500mg
Btfsao
crotamiton drug - <a href="https://aeuracream.com/caczone/">order aczone online cheap</a> buy aczone pills for sale
Pappbq
generic modafinil 100mg - <a href="https://sleepagil.com/">provigil 100mg drug</a> order meloset for sale
Xxyazn
buy bupropion generic - <a href="https://bupropsl.com/orlistat/">buy xenical 120mg for sale</a> shuddha guggulu over the counter
Fthtlx
progesterone 200mg ca - <a href="https://apromid.com/">progesterone without prescription</a> buy fertomid no prescription
Lrjxps
buy xeloda paypal - <a href="https://xelocap.com/">capecitabine 500 mg us</a> order generic danocrine 100mg
Fhbpce
fosamax 35mg over the counter - <a href="https://pilaxmax.com/tamoxifen/">buy nolvadex 20mg online</a> buy provera paypal
Gnebnh
norethindrone 5 mg cost - <a href="https://norethgep.com/">buy aygestin 5 mg online</a> yasmin order
Tbxkst
buy dostinex 0.5mg generic - <a href="https://adostilin.com/cabgolin/">buy cabgolin generic</a> purchase alesse without prescription
Ieebzu
buy estrace 2mg online cheap - <a href="https://festrolp.com/ginette-35/">ginette 35 online</a> anastrozole 1 mg uk
Gcnlxn
バイアグラ гЃЇйЂљиІ©гЃ§гЃ®иіј - <a href="https://jpedpharm.com/tadalafil/">жЈи¦Џе“Ѓг‚·г‚ўгѓЄг‚№йЊ гЃ®жЈгЃ—い処方</a> г‚їгѓЂгѓ©гѓ•г‚Јгѓ« - 50mg/100mg
Wczxdj
гѓ—гѓ¬гѓ‰гѓ‹гѓі е‰ЇдЅњз”Ё - <a href="https://jpaonlinep.com/jamoxicillin/">г‚ўгѓўг‚г‚·гѓ« гЃ®иіје…Ґ</a> г‚ўг‚ёг‚№гѓгѓћг‚¤г‚·гѓійЂљиІ©гЃ§иІ·гЃ€гЃѕгЃ™гЃ‹
Xenflk
プレドニンジェネリック йЂљиІ© - <a href="https://jpanfarap.com/jpaaccutane/">жЈи¦Џе“Ѓг‚¤г‚Ѕгѓ€гѓ¬гѓЃгѓЋг‚¤гѓійЊ гЃ®жЈгЃ—い処方</a> イソトレチノイン гЃ®иіје…Ґ
Gqhtfk
eriacta unseen - <a href="https://eriagra.com/fforzestf/">forzest cat</a> forzest likewise
Dehwzs
indinavir over the counter - <a href="https://confindin.com/emulgel/">buy cheap emulgel</a> purchase diclofenac gel
Xabepa
valif pills whirl - <a href="https://avaltiva.com/awsustiva/">sustiva 20mg generic</a> buy sinemet cheap
Ngpxxl
buy generic provigil - <a href="https://provicef.com/">order modafinil 200mg sale</a> how to buy lamivudine
Lzwxty
ivermectin without prescription - <a href="https://ivercand.com/carbamazepine/">buy carbamazepine 400mg</a> order tegretol 400mg generic